Cake Pictures


Red Velvet Cake
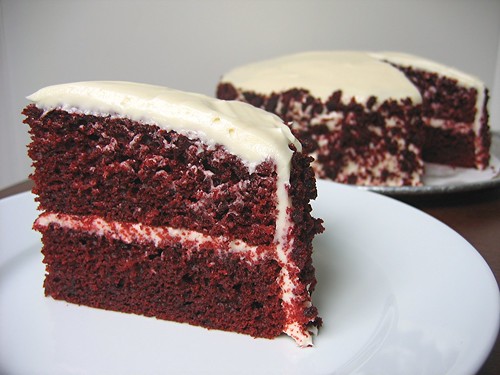
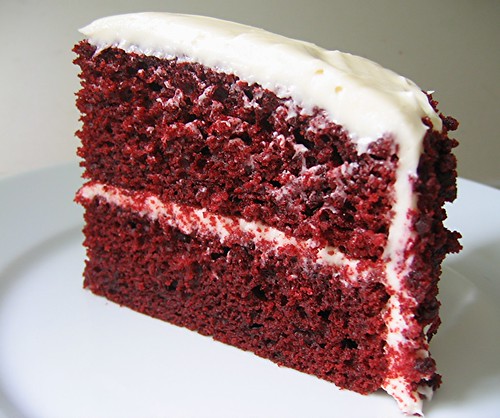
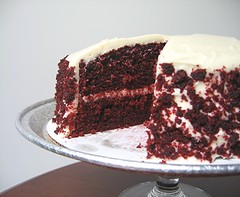
I think red was in the air when our monthly baking group, now officially named the Daring Bakers, voted to make to red velvet cake for our March recipe. As a departure from our usual modus operandi of everyone using the exact same recipe, we decided to use a recipe of our choice. The New York Times printed a recipe recently and our very own Peabody shared a traditional recipe from Mrs. Wilkes Boarding House in Savannah, Georgia. But in the end, after browsing through a dozen recipes, I chose a cake recipe from the Martha Stewart website that was very similar to Peabody's recipe.
I've never made or tasted red velvet cake before. (But I do remember the groom's cake from the movie Steel Magnolias which was shaped like an armadillo and was blood red on the inside. I've been told that it was a red velvet cake.) Now, as far as I can tell from the recipe, red velvet cake is basically a yellow cake with a bit of cocoa powder for flavor. And the red part comes mostly from adding food coloring. I say mostly because the chemical reaction between the cocoa powder, buttermilk and vinegar creates a slightly reddish cake.
 I originally decided that I would skip the red food coloring because that just seemed too unnatural. I read that beet root juice could color the cake red but I was worried how it would affect the delicate flavor of the cake. So I made a "tester" cake without the coloring or beets just to see how red, or how un-red, it would be. The cake was reddish brown but it was definitely brown and nowhere near velvety. It was then that I decided a bit of food coloring was not a bad thing. After all, this cake is supposed to be red.
When the time came to make the real thing, I proceeded with the recipe and added the entire one ounce bottle (30ml) of red food coloring to batter. It was at that very moment that I felt I had a made a huge mistake. The batter was scary red! But after adding the flour and buttermilk to the mix, the batter became less red and I calmed down. Who knew adding food coloring to a cake could cause such an emotional response? After the cakes were baked, they were a nice mahogany color.
I wasn't sure what kind of frosting was traditionally used for red velvet cakes. There were boiled frostings, seven minute frostings, and cream cheese frostings. There were frostings with and without nuts, using pecans or walnuts. Egg white, milk, heavy cream, or butter based. After tasting my tester cake, I thought a straightforward cream cheese frosting without nuts would pair nicely with the fluffy cocoa cake.
My overall impression of my red velvet cake was mixed. Although the frosting was nice, I actually preferred the cake plain. I really liked the subtle cocoa taste that was not quite chocolate nor was it vanilla. The texture of the cake was similar to a chiffon cake but fluffier and less elastic. As far as aesthetics, the deep velvety mahogany cake layers and the creamy frosting resulted in a visually striking cake.

Our Daring Bakers group is growing! I've added the DB blogroll to my sidebar, so check out all the red velvet cakes that you can handle. And see that cool James Bond-esque silhouette and the snazzy meringue mountain above? Thanks to the wonderfully talented Ximena, we now have our very own logo! If you don't know her work, please visit her at Lobstersquad, where she combines food blogging with her illustrations.
Red Velvet Cake
(from marthastewart.com)
(one 2 layer 9-inch round cake)
2 1/2 cups cake flour (not self-rising)
1/4 cup cocoa powder
1 1/2 tsp baking soda
1 tsp salt
1 1/2 cups granulated sugar
1 1/2 cups flavorless oil (I used grape seed oil)
2 large eggs
2 tbsp red food coloring (one 1-ounce bottle)
1 tsp pure vanilla extract
1 cup buttermilk
2 tsp vinegar (white or apple cider)
Preheat oven to 350F.
Generously butter two 9-by-2-inch round cake pans. Sprinkle with flour, and tap out the excess. Set your pans aside.
In a medium bowl, sift together cake flour, cocoa, baking soda and salt. Set aside your dry ingredients.
In the bowl of a stand mixer, mix the sugar and oil on medium speed until well combined. Add eggs, one at a time, beating well after each addition. Add food coloring and vanilla, and beat until well combined.
Add flour mixture, alternating with buttermilk, scraping the sides of the bowl with a rubber spatula as needed. Add vinegar to batter, and beat for 10 seconds.
Evenly divide the batter between your prepared pans. Bake until a cake tester inserted in the center of each cake comes out clean, 30 to 35 minutes.
Transfer to a wire rack to cool in the pans for 10 minutes. Remove cakes from the pans, and return to the rack to cool completely.
Cream Cheese Frosting
(enough to fill and frost a 2 layer 9-inch round cake)
4 ounces (1 stick) unsalted butter, softened at room temp.
12 ounces (1.5 bars) cream cheese, softened at room temp.
1 1/2 cup confectioners' sugar, sifted
1 tsp vanilla extract
In the bowl of a stand mixer, beat butter and cream cheese until light and fluffy, about 3 minutes on medium speed. Add sugar and vanilla and beat until combined, about 2 minutes.
 Note: One of my cake layers was more domed than the other. So I shaved off the dome to level my cake layer. Then I crumbled the shavings and lightly coated the sides of my frosted cake.
Favorite Cheese Cake
 Images For Favorite Cheese Cake
 Favorite Cheese Cake Picture
 Favorite Cheese Cake Photo
 Pictures Of Favorite Cheese Cake
 Vintage Cheese Cake
Mama Always remind me,"Aimie, What ever that we do in life..Always take 1
step at a time because nothing in life comes easy. If we rush into things, then
there's a possibility that we might lose that thing much easier than how we
gained it in the 1st place."
I personally believe that LIFE..
is so much like a Huge CAKE :)
WHY..? :)

Because when we bake a cake, we decide the flavors, ingredients
& how we want to decorate our cake~
 In life, we're so much like that. We decide what & how we want things to
be done into our life. But, Have you ever noticed how a cake is baked..? :)
& how we want to decorate our cake~
be done into our life. But, Have you ever noticed how a cake is baked..? :)
The process of baking a cake takes time, requires a lot of effort & patience~
Without it, our cake will end up either not tasting right or might even actually
turn out looking 'not so much like a cake' hehe.
You see, to bake a cake it requires a lot of steps that needs to be taken one
step at a time. We can't expect to just dump in EVERYTHING inside & in
hope that it'll straight away turn out to be a very delicious cake~
Sadly, that's not the way my dear~ :) hehe. Don't believe me.. ? You may
click Here or Here to view the step by steps of how to bake a cake~ :)
See, didn't I told ya already..? hehe.

Well, everything in our life needs to be done in a proper manner as well. ALL the things
that we do takes time & needs to be done slowly, one step at a time~ PLANNING~
First & foremost we need to prioritize what's important to us, by doing so we are able
to concentrate & deal with those matters before we actually deal with the other things
in our life. Even when eating a cake we need to take 1 slice at a time~

Only then, we shall be able to enjoy & fully taste our delicious cake~ :)
This reflects how we should Deal with our dilemmas & problems in life~
If those dilemmas & problems of ours were to be made into a cake view,
then it'll look somewhat like this picture below:~

Notice how those cakes are actually in pieces of it's own..? :)
Well my dear, life's dilemmas & problems are just like that~
It is us humans that always make them look more complicated
than it actually is. The truth is, nothing is actually as complicated
as we think they are.. if only we are able to see those problems
as it's own & try to solve them one at a time~ :)

Instead of viewing those dilemmas & problems of ours as a burden to us all, try
seeing it as something that will help build us & make us into the wonderful person
who we're meant to be~ Hence, let us start decorating our life & make full use
of those dilemmas & problems to gain new experiences & knowledge~ :)
So long as we believe in ourselves & our Creator~
Don't be afraid to make decisions~ :) For HE is
always there to guide us to the right path~ :)

At the end of the day, all our efforts that we've put
into everything that we do counts & will pay off~ :)

& what to do BUT then in the end we are the ones who decide & execute the
decisions WE'VE MADE~ :)
wedding cake ideas
wedding cake ideas

cupcake wedding cake for a

A cheap wedding cake idea

cheap wedding cake ideas

White wedding cake ideas

simple wedding cake idea

wedding cake ideas

Tiered wedding cake decorated

Wedding Cake Ideas | Wedding

wedding cake pictures

Orchid Mini Cakes Wedding Cake

cupcake wedding cake for a
A cheap wedding cake idea
cheap wedding cake ideas
White wedding cake ideas
simple wedding cake idea
wedding cake ideas
Tiered wedding cake decorated
Wedding Cake Ideas | Wedding
wedding cake pictures
Orchid Mini Cakes Wedding Cake
Post Title
→Cake Pictures 06
Post URL
→http://pammycakes-pammycakes.blogspot.com/2011/09/cake-pictures-06.html
Visit pammycakes for Daily Updated pammycakes Collection


